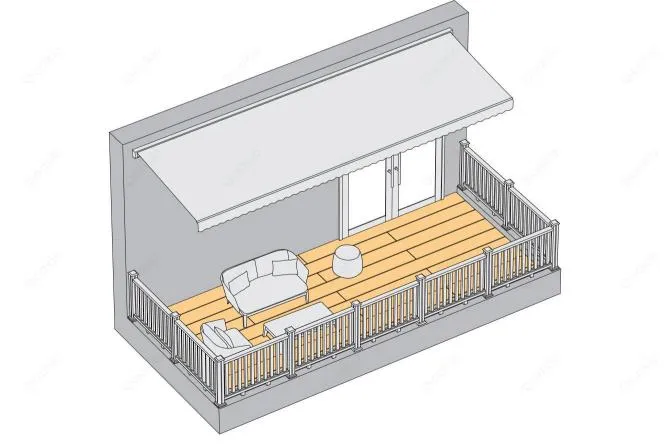
Composite decking is a popular choice for outdoor spaces due to its durability, low maintenance, and resistance to rot and insects. Proper installation is key to ensuring a long-lasting, beautiful deck.
How to install composite decking? This guide covers everything you need to know—from materials and tools to step-by-step installation and expert tips.
Materials and Tools Needed
Gather all necessary materials and tools before starting your composite decking installation.
Materials List:
- Composite decking boards
- Joists (wood, aluminum, or steel—check local building codes)
- Fascia boards (for perimeter finishing)
- Deck clips (“T” clips or “n” clips in stainless steel, aluminum, or plastic)
- Deck screws (corrosion-resistant for outdoor use)
Tools List:
- Circular saw or jigsaw (for cutting deck boards)
- Drill/driver (for fastening clips and screws)
- Tape measure & carpenter’s square (for precise measurements)
- Safety glasses & gloves (essential for protection)
- 3mm or 6mm board spacers (gap size depends on temperature)

Step-by-Step Composite Decking Installation Guide
Step 1: Prepare the Flat Ground and Substructure
Prepare a solid foundation by first leveling the ground and removing all debris. For ground-level installations, establish a stable base with properly compacted gravel. When building elevated decks, assemble a structural framework using pressure-treated joists spaced at the manufacturer’s specified intervals.
Step 2: Install the Joist
Once your ground preparation is complete, you can begin installing the support joists. Proper joist spacing is critical for structural integrity. The distance between joists (called “spacing”) changes depending on the decking type because each design handles weight differently – follow these spacing guidelines based on your decking type:
- a. Square hollow profile decking: 12 inches between joists
- b. Round hollow profile decking: 14 inches between joists
- c. Solid decking: 16 inches between joists
These spacing recommendations ensure:
- Optimal weight distribution
- Prevention of sagging or bending
- Long-term durability of your deck
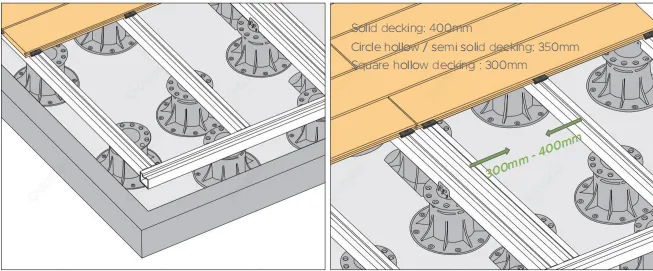
Always verify spacing requirements with your specific product’s installation manual, as materials may vary by manufacturer.
Next, pre-drill holes into the joists at the marked screw locations for the composite decking. This step ensures smoother and more precise installation later on.
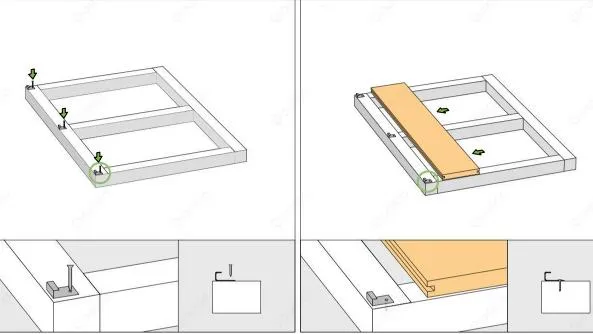
Step 3: Install Starter Clips & Position the First Decking Board
Begin by securing starter clips to the joists along the perimeter. These clips provide a stable foundation for the first row of decking. Maintain an 5/16 inch gap between the starter clips and any adjacent walls to allow for proper expansion.
Place the first composite deck board onto the starter clips, ensuring it aligns with your layout marks and joists.
Step 4: Continue Installing Remaining Boards
Insert 1/4 inch spacers between each subsequent board to maintain consistent expansion gaps. These gaps accommodate natural material movement due to temperature and humidity changes. Use a spirit level frequently to check for levelness and adjust as needed.
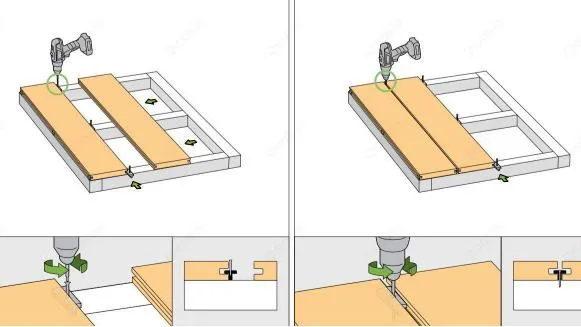
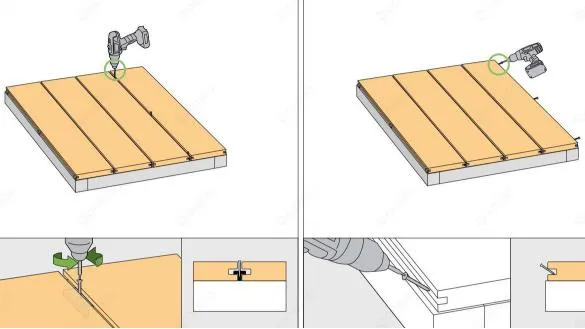
For precise fits, trim boards with a circular saw or jigsaw when encountering obstacles or edges.
Repeat the process until installation is nearly complete. Before finishing the installation of composite decking boards, double-check:
- All boards are level and securely fastened
- Expansion gaps are uniform (1/4 inch recommended)
- Cut edges are clean and properly aligned
Step 5: Fascia Installation (Optional)
For a polished finish and added protection, install fascia boards along the exposed edges of your deck. These trim pieces:
- Conceal raw decking edges for a clean appearance
- Help prevent moisture intrusion into the deck structure
- Enhance overall durability
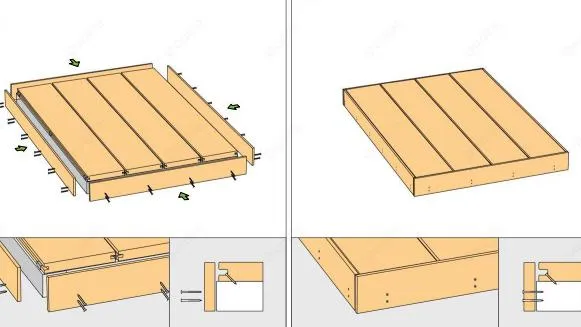
Secure fascia boards using corrosion-resistant screws, spacing them according to manufacturer guidelines (typically 12 to 16 inches apart). Ensure proper alignment with the deck surface for a seamless look.
Step 6: Final Check
Ensure proper drainage to prevent standing water. Check all clips and screws are tight. Remove debris from the surface for a clean finish. These steps protect your deck’s longevity and appearance.
Important Tips for a Successful Installation
To ensure your deck’s longevity and performance, keep these critical guidelines in mind:
1. Manage Heat Exposure
Position decking away from reflective surfaces like low-emissivity windows or metal siding, which can concentrate heat and cause surface damage. In sunny climates, consider lighter-colored boards that absorb less heat.
2. Comply With Regulations
Verify local building codes for: minimum joist spacing requirements, safety railing height specifications (typically 35 to 43 inches), frost line considerations for footings. Obtain necessary permits before starting construction.
3. Maintain Proper Board Spacing
lways use manufacturer-recommended spacers during the installation—typically between 5/32–1/4 inch (4–6mm)—to allow for seasonal expansion of composite decking. In colder climates, boards contract during installation and will expand in warmer months, so wider gaps (around 1/4 inch) are necessary. In temperate zones, standard gaps (about 5/32 inch) are usually sufficient to handle normal expansion.
So, account for seasonal expansion:
- Standard board spacing (5/32 inch) in temperate zones
- Wider board spacing (1/4 inch) in colder climates
4. Monitor Installation Conditions
- Ideal temperature range: 10–30°C during installation.
- In hot weather: Work early morning/late afternoon; Store boards in shade before installation.
- In cold weather: Allow extra acclimation time; Use winter-grade fasteners
Get More Resource On How to Install Composite Decking
Composite decking installation is easier than traditional wood, but proper technique ensures durability and aesthetics. By following these guidelines—preparing the base, spacing correctly, and using the right fasteners—you’ll have a beautiful, long-lasting deck with minimal maintenance. If you still have questions about the installation steps, you can also check this installation video: How to Install Composite Decking. Want to know more about composite decking? you can also read this full guide: Everything You Need to Know About Composite Decking
The composite decking installation images featured in this guide are sourced from Oakio’s official composite decking installation guide. Want to get more insights on composite decking and eco-friendly home upgrades? Visit ecobuildhome.com, where you can find useful maintenance tips and buying guides for wood composite and sustainable materials.